Importing Fields
Creating Fields
-
Creating Fields
Important note:
Users can create and manage other users in their Adapt-N account by clicking the Settings icon on the navigation bar and then clicking User and Grower List. In order to create a field, you must create a Grower Account for the field to reside. Grower Accounts are automatically created when fields are imported through integrated software systems. See this article for additional instructions.
Creating Fields
Select the “land” icon from the left navigation bar, then choose the appropriate Grower Account. If no fields already exist within the Grower Account, the user will be taken directly to a page with field creation options. If fields already exist, click the
icon at the top of the Fields & Zones list to add an additional field. Alternatively, fields can be created using an external data source, such as agX, Agrian, or John Deere Operations Center which can be found in Adapt-N settings. Depending on the Adapt-N account’s settings, one or more of the following field creation options will be presented:
- Drop a shapefile: drag onto the browser dropzone a zip file containing the .shp, .shx, and .dbf components of a field’s boundary shapefile. See this article for detailed instructions. Multi-field bulk import of fields via shapefile is now also supported.
- Draw on Map
- Sync with a source: if the user’s account is connected to an external data source, such as the agX Platform, an interface will load allowing the user to select one or more fields from the source system. If the user’s account has not yet been connected to an external data source, the user will be prompted to establish the connection (if the Adapt-N account is enabled for such access). See this article for detailed instructions.
Drawing Fields
To create a field by drawing it, click the land icon in the Navigation Bar. If no fields exist in your account, click anywhere in the "Draw on a map" circle:
If one or more fields already exists in your account, clicking the land icon will take you to your Farm View. To add a new field from here, click the "+" icon in the upper right of the Fields and Zones list:
Once inside the drawing application:
- center the map by entering an address, zip code, or GPS coordinates, and click "Center Map". Or, grab and move the map to locate your area of interest.
- zoom in to find the field of interest
- select from existing boundaries or draw new boundaries to create a field
Selecting from Existing Boundaries
Adapt-N pre-populates the maps with likely boundaries of existing fields. These are represented by a dark boundary outline. When your mouse hovers within those boundaries, the field darkens, such as:
To select a field, simply click within the boundaries. To select multiple boundaries to be treated as one field within Adapt-N, shift-click the additional desired field(s) (this functionality is not supported on touch devices). You may adjust the boundaries of any selected field by using the hand icon to grab and move the white angle points. For example:
You may also add custom drawn boundary components to selected existing boundaries by shift-clicking the polygon icon from the top of the page. (see Draw New Boundaries instructions in the next section)
Note: single clicking (without Shift) on the polygon drawing tool or single clicking on any existing boundary will clear all existing selections.
Draw New Boundaries
- to begin drawing, click the polygon tool icon in the top center of the map
- click and release the mouse to establish the first point in the field polygon
- move the mouse to the next desired point in the polygon, click and release
- continue this process to create a fully closed polygon
- to complete the shape, double click, or click on the first point of the shape; the field will turn red indicating that it is ready for submission
- you may optionally adjust any points by clicking the hand icon tool at the top of the page and grabbing and moving the white angle points
Once the desired boundaries have been specified, click "Submit Location" to complete save the field.
-
Field Setup
After importing a boundary your field will need to be named. If you imported a field boundary from a source, the field name will automatically match the field name from the source.
Users are also asked to choose a field mode and automatic zone creation setting.
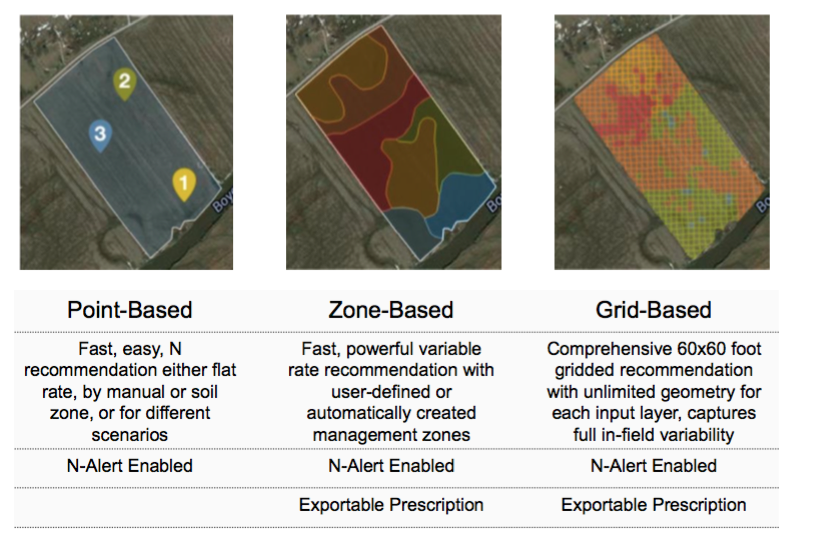
Field Modes
Adapt-N has three Field Modes supporting flexible zone management preferences.
Automatic Zone Creation
Zone Creation options are:
- None: no zones are automatically created. Use the "Add Zone" link to manually create zones after the field is created.
- Single Zone: a single whole-field zone is created. For point-based fields, this is represented as a single point placed roughly in the center of the field. For zone-based fields, a polygon is created matching the boundaries of the field.
- By Soil Type: a zone is created for each unique soil texture/slope/drainage combination in the Soil Survey database for the field. For both field modes, all soil texture, slope, drainage, and rooting depth parameters are automatically set during the import process. They can be manually adjusted by visiting the Land parameters for the zone after import. Note that Zone-Based (Polygon) fields for which the same soil texture/slope/drainage combination exists more than once in the field, a multi-polygon zone will be created as a single zone in Adapt-N.
- Shapefile: select a zipped shapefile to create zones based on the geometry from that shapefile. Optionally, an attribute (column) from that shapefile can be selected to be used to set each zone's name. An option also exists to consolidate all zones with the same name.
Point-Based and Zone-Based fields have all options available for Automatic Zone Creation. Grid-Based fields do not have user-defined zones, so no options are presented.
If the field was imported via a source system, such as agX, and Management Zones exist in the source system, a fourth Automatic Zone Creation option will be provided:
- Management Zones: the list of available Management Zone sets will be displayed, and zones in Adapt-N will be created to match the Management Zones from the source system. Soil texture, slope, drainage, and rooting depth parameters will be set automatically during the import process, but can be edited by visiting the Land parameters for the zone after import.
-
Adding Zones
Once you have uploaded or drawn a field you can add zones to it. Each field must have at least one zone. To do so, go to the Land tab and click the Add Zone link associated with the field you are working with.
For Point-Based Zone Fields
- Click anywhere on the map outside of the designated field to drop a pin.
- After dropping the pin, drag it into the desired location with the field.
- Enter the requested data and click the Add Zone button.
For Polygon-Based Zone Fields
- Click the polygon tool at the top of the page
- Click a point, then click to create another point to draw the zone boundary. Continue creating points until the polygon is closed, or double click to automatically close it.
- Optionally use the white points to make adjustments.
- Enter the requested data and click the Add Zone button.
-
Changing Field Modes
Adapt-N has three field modes for the creation and management of zones, enabling flexible configuration based on different usage preferences. When creating fields, you may select from any of the modes enabled for your account:

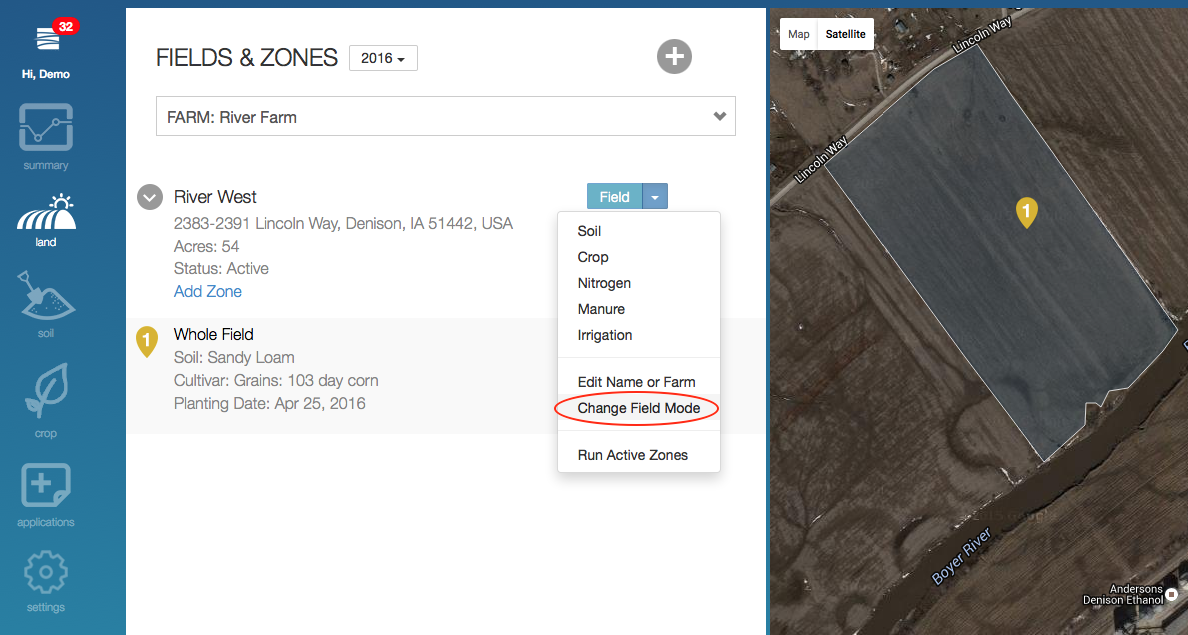
After a field has been created, you may optionally switch to another mode by viewing the Fields & Zones (map) page, clicking the Field menu, and selecting Change Field Mode:
The next screen presents the options for choosing a new field mode, and also lets you choose whether to delete the previous version of the field or not. In this example, the existing field version is point-based and the user will change it to polygon-based:
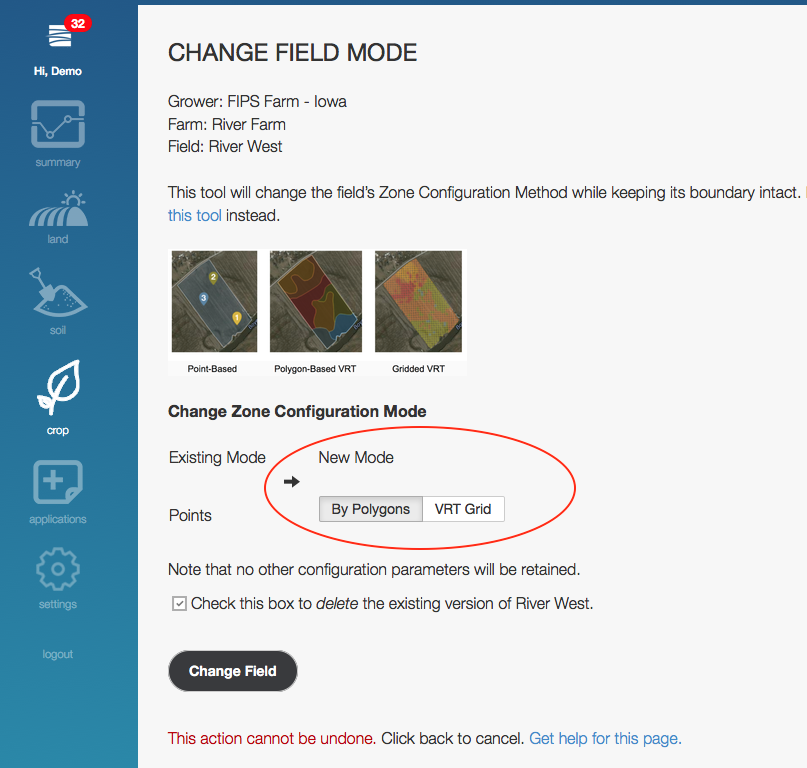
Important note: this process keeps the existing field's boundaries intact. Since the fundamental representation of the zones is changing, no data associated with old zones (such as yield goal, planting date, etc.) will be carried forward to the new zones. This includes the zones themselves, which will need to be added via any of the supported methods available for new fields.
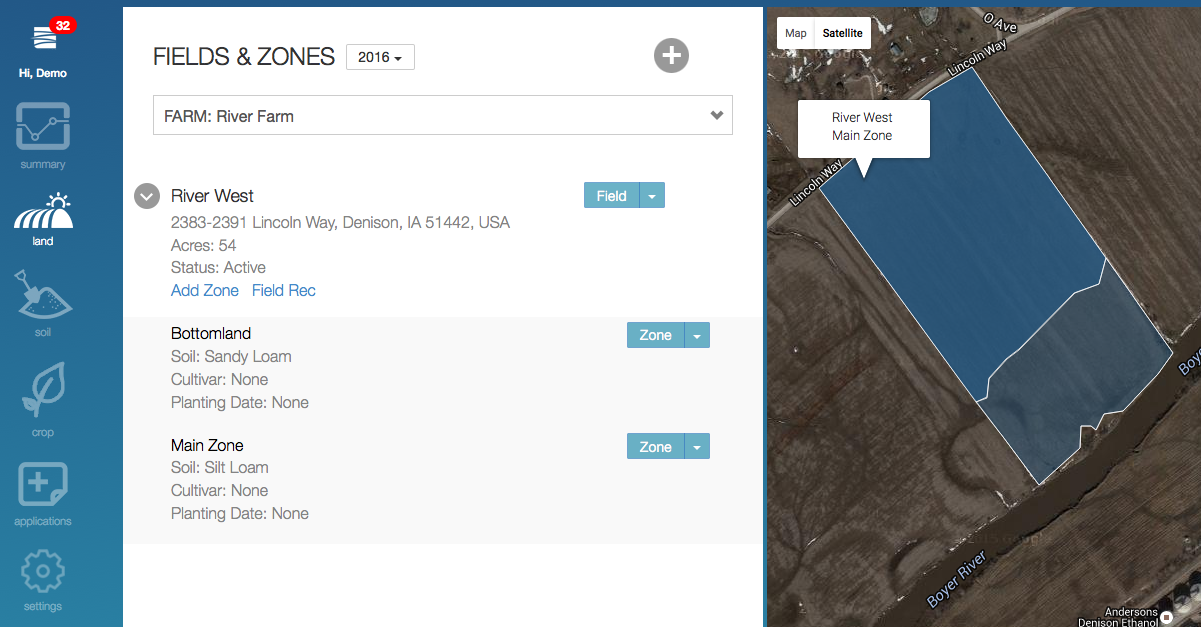
Once the user clicks Change Field, the new field is displayed in the Map View. From here, create/manage zones and configure the field just as if it had recently been created.
If the existing field is Activated and it is marked for deletion during this process, the new field will automatically be Activated. No additional acreage charges will occur. If the existing field is Activated but it is not marked for deletion, it will remain Active and the new field will be Inactive. The user will need to explicitly Activate the new field to create in-season recommendations. If your intention was to replace the old field and deactivate it, but do not want to delete it permanently, please contact support for assistance.